
We're about to shake up your kitchen with five recipes that'll make you do a double-take. These aren't your typical dishes – we're talking breakfast transformed into sushi, watermelon reimagined as pizza, and buffalo wings with a chocolate twist. Whether you're an adventurous cook or just looking to surprise your taste buds, these unexpected combinations prove that sometimes the weirdest pairings create the most amazing flavors. Let's explore these culinary creations that'll challenge everything you think you know about food.
Savory Breakfast Sushi Rolls

Savory breakfast sushi rolls transform traditional morning favorites into an innovative fusion dish that brings excitement to your breakfast table. By combining classic breakfast ingredients with Japanese-inspired preparation techniques, these rolls create a perfect balance of textures and flavors while offering a portable and customizable meal option.
This recipe reimagines breakfast staples like eggs, bacon, and avocado in an elegant roll format, making it ideal for both casual morning meals and special brunch occasions. The combination of seasoned sushi rice with Western breakfast ingredients creates a unique cross-cultural dining experience that's both satisfying and nutritious.
| Ingredient | Amount |
|---|---|
| Sushi rice | 2 cups |
| Rice vinegar | 1/4 cup |
| Nori sheets | 4 sheets |
| Eggs (scrambled) | 3 large |
| Avocado | 1 medium |
| Cream cheese | 4 oz |
| Bacon (cooked) | 6 strips |
| Smoked salmon | 4 oz |
| Green onions | 2 stalks |
| Soy sauce | For serving |
Cook sushi rice according to package instructions and season with rice vinegar. Once cooled, lay a nori sheet on a bamboo mat and spread rice evenly, leaving a 1-inch strip at the top edge bare. Layer your chosen fillings in the center of the rice, starting with scrambled eggs, followed by avocado slices, cream cheese, and either bacon or smoked salmon. Using the bamboo mat, roll the sushi tightly away from you, applying even pressure. Moisten the bare edge of nori with water to seal the roll. Let rest for 5 minutes before cutting into 8 pieces with a sharp, wet knife.
For best results, make sure the rice has cooled completely before rolling to prevent the nori from becoming soggy. Pre-cook and cool all hot ingredients to avoid temperature contrast in the final roll. Keep a bowl of water nearby to prevent rice from sticking to your hands during assembly. These rolls can be made ahead and stored in the refrigerator for up to 24 hours, wrapped tightly in plastic wrap. Serve with traditional soy sauce or experiment with breakfast-friendly dipping sauces like hollandaise or spicy mayo.
Grilled Watermelon Pizza

Grilled watermelon pizza transforms a beloved summer fruit into an elegant and invigorating dish that challenges traditional culinary boundaries. The grilling process caramelizes the watermelon's natural sugars, creating a complex flavor profile that pairs beautifully with both savory and sweet toppings.
This versatile dish can be served as an appetizer, light main course, or even dessert, making it perfect for summer entertaining. The combination of warm, grilled watermelon with cool, fresh toppings creates an exciting contrast of temperatures and textures that will surprise and delight your guests.
| Ingredient | Amount |
|---|---|
| Watermelon | 1 large round slice (2" thick) |
| Feta cheese | 1/2 cup, crumbled |
| Fresh mint leaves | 1/4 cup, torn |
| Balsamic glaze | 2 tablespoons |
| Extra virgin olive oil | 2 tablespoons |
| Black pepper | To taste |
| Sea salt | To taste |
| Arugula (optional) | 1 cup |
| Prosciutto (optional) | 4 thin slices |
Start by cutting a large watermelon into 2-inch thick rounds. Brush both sides with olive oil and season lightly with salt and pepper. Preheat your grill to medium-high heat (around 400°F). Grill the watermelon rounds for 2-3 minutes per side until grill marks appear and the fruit begins to caramelize. Remove from heat and let cool slightly. Top with crumbled feta cheese, torn mint leaves, and a drizzle of balsamic glaze. If desired, add arugula and prosciutto just before serving. Cut into wedges like a traditional pizza.
For best results, choose a firm, ripe watermelon and pat the slices dry before grilling to prevent excessive moisture. Avoid overgrilling, as the watermelon can become mushy. If you don't have access to a grill, you can achieve similar results using a grill pan on high heat. The grilled watermelon pizza is best served immediately while the contrast between warm fruit and cool toppings is at its peak. Leftovers can be stored in the refrigerator for up to 24 hours, though the texture may change slightly.
Coffee-Rubbed Sweet Potato Tacos

Coffee-Rubbed Sweet Potato Tacos combine two unlikely ingredients to create a surprisingly delightful fusion of flavors. The earthiness of coffee pairs perfectly with the natural sweetness of roasted sweet potatoes, while traditional Mexican spices add depth and complexity to this unique dish.
This vegetarian-friendly taco recipe delivers a powerful punch of nutrients while satisfying even the most discerning palate. The combination of sweet, smoky, and slightly spicy flavors creates a memorable dining experience that will have your guests asking for the recipe.
| Ingredient | Amount |
|---|---|
| Sweet potatoes | 2 large, cubed |
| Ground coffee | 2 tablespoons |
| Smoked paprika | 1 tablespoon |
| Ground cumin | 1 teaspoon |
| Chili powder | 1 teaspoon |
| Garlic powder | 1 teaspoon |
| Salt | 1 teaspoon |
| Black pepper | 1/2 teaspoon |
| Corn tortillas | 8-10 |
| Avocado | 1, sliced |
| Fresh cilantro | 1/2 cup, chopped |
| Lime wedges | 2 limes |
Preheat your oven to 425°F (220°C). In a small bowl, mix ground coffee with all dry spices. Toss cubed sweet potatoes with olive oil in a large bowl, then coat evenly with the coffee-spice mixture. Spread sweet potatoes on a lined baking sheet and roast for 25-30 minutes, stirring halfway through, until tender and slightly crispy. While the potatoes roast, warm the tortillas in a dry skillet. Assemble the tacos by filling each tortilla with the coffee-rubbed sweet potatoes and topping with sliced avocado, fresh cilantro, and a squeeze of lime juice.
For best results, choose firm sweet potatoes and cut them into uniformly sized cubes to guarantee even cooking. The coffee rub can be made ahead and stored in an airtight container for up to one month. If you prefer less heat, reduce the amount of chili powder, and for extra protein, consider adding black beans or queso fresco. The sweet potatoes should be spread in a single layer on the baking sheet to achieve maximum crispiness.
Chocolate-Dipped Buffalo Wings
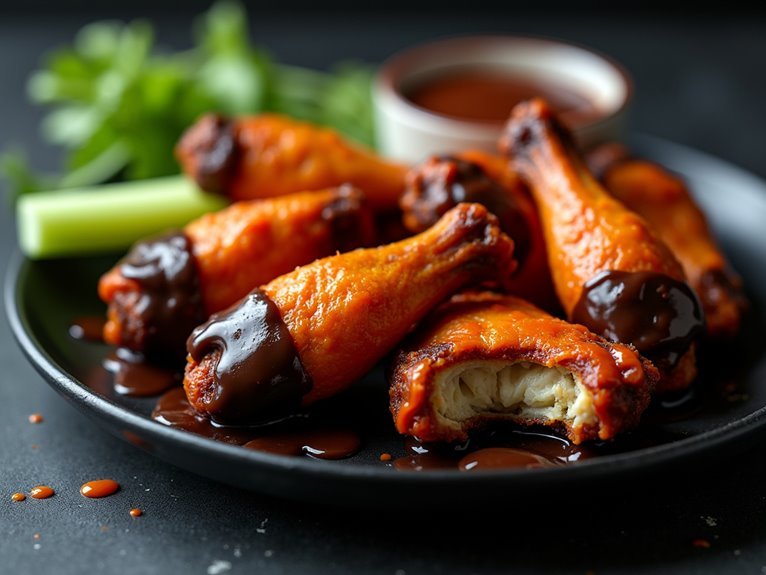
Chocolate-dipped buffalo wings represent a bold fusion of sweet and spicy flavors that challenge traditional culinary boundaries. The combination of rich chocolate and tangy buffalo sauce creates an unexpected taste sensation that transforms ordinary chicken wings into a unique conversation starter at any gathering.
This unconventional recipe takes the familiar comfort of buffalo wings and elevates them with a decadent chocolate coating. The contrast between the spicy buffalo sauce and sweet chocolate creates a complex flavor profile that surprises and delights the taste buds.
| Ingredient | Amount |
|---|---|
| Chicken wings | 2 pounds |
| Buffalo sauce | 1 cup |
| Semi-sweet chocolate | 12 ounces |
| Vegetable oil | 2 tablespoons |
| Garlic powder | 1 teaspoon |
| Salt | 1 teaspoon |
| Black pepper | 1/2 teaspoon |
| Blue cheese dressing | For serving |
| Celery sticks | For serving |
Preheat the oven to 400°F and line a baking sheet with parchment paper. Pat the wings dry and season with garlic powder, salt, and pepper. Arrange wings on the baking sheet and bake for 45-50 minutes until crispy, flipping halfway through. In a large bowl, toss the hot wings with buffalo sauce until well coated. Allow wings to cool for 10 minutes. Meanwhile, melt chocolate with vegetable oil using a double boiler or microwave in 30-second intervals. Dip each wing partially in melted chocolate, allowing excess to drip off. Place on a parchment-lined tray and refrigerate until chocolate sets, about 15 minutes.
For best results, verify wings are completely cooled before dipping in chocolate to prevent the chocolate from seizing. Use high-quality chocolate for better melting and coating consistency. The chocolate coating should be thin to maintain a balanced flavor profile. Store any leftovers in an airtight container in the refrigerator for up to 2 days, though they're best served fresh when the contrast between warm wings and cool chocolate is most pronounced.
Peanut Butter Pickle Sandwiches
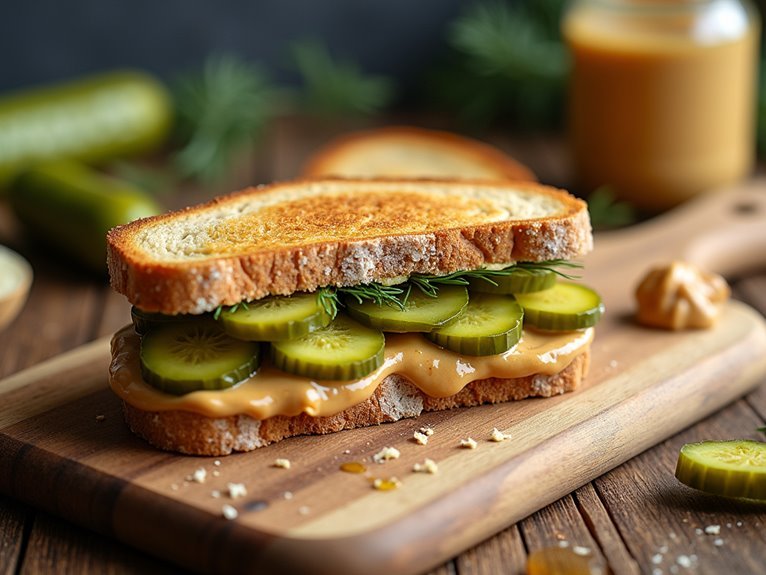
The humble peanut butter pickle sandwich is a delightful contradiction of flavors that has been enchanting adventurous food lovers for generations. The combination of creamy, nutty peanut butter with the sharp, briny crunch of pickles creates an unexpectedly harmonious taste experience that challenges conventional sandwich expectations.
This simple yet innovative sandwich has evolved beyond its basic form, with creative cooks adding their own twists to enhance the flavor profile. While purists stick to the classic combination, others experiment with different pickle varieties, artisanal peanut butter, and complementary ingredients to elevate this unique creation.
| Ingredient | Amount | Notes |
|---|---|---|
| Bread slices | 2 | White or whole grain |
| Peanut butter | 2-3 tablespoons | Smooth or chunky |
| Dill pickles | 4-5 slices | Well-drained |
| Honey (optional) | 1 teaspoon | For added sweetness |
| Bacon (optional) | 2 strips | Crispy, crumbled |
| Salt | Pinch | To taste |
Start by spreading a generous layer of peanut butter evenly on both slices of bread, ensuring complete coverage to the edges. Pat the pickle slices dry with a paper towel to remove excess moisture, then arrange them in a single layer on one slice of the bread. If using optional ingredients, drizzle honey over the pickles or sprinkle crumbled bacon on top. Add a small pinch of salt if desired, then close the sandwich with the second slice of bread, peanut butter side down. Cut diagonally for the classic presentation.
For the best results, choose crisp dill pickles rather than sweet varieties, as they provide the ideal tangy contrast to the peanut butter. Store-bought pickles work well, but homemade pickles can add an extra special touch. If toasting the bread, allow it to cool slightly before spreading the peanut butter to prevent melting. The sandwich can be wrapped and refrigerated for up to 4 hours, making it a great make-ahead lunch option, though it's best enjoyed fresh when the bread is at its peak texture.
Conclusion
Just like a painter mixing unexpected colors to create a masterpiece, we've explored five unique recipes that push culinary boundaries. We hope these creative combinations inspire you to experiment in your own kitchen and discover new flavor profiles. From breakfast sushi to chocolate-dipped wings, these dishes prove that some of the best culinary adventures come from thinking outside the box. Let's keep exploring and creating together!