

These apple pie bars have genuinely earned their spot as my favourite autumn dessert. They deliver everything you love about a classic apple pie — a buttery, flaky base, a filling that’s warmly spiced and tender, and that crumbly, golden topping that makes your kitchen smell like the best version of October — but without any of the fuss. No rolling pin. No crimped edges. Not a single moment of pastry anxiety.
What makes the recipe click so well is the way the three layers work together. The shortbread base is pressed (not rolled) straight into the pan, and it bakes up sturdy enough that you can genuinely pick these up with your fingers. The apple filling — thinly sliced, tossed with cinnamon and a little lemon — softens into something almost jammy in the oven. And the streusel on top goes crunchy and caramelised while the apples do their thing underneath. Together they’re a better combination than regular pie, in my honest opinion.
The other great thing? These bars travel. Stack them in a tin, pop the lid on, and they arrive at a potluck or a bake sale in perfect shape. If you’re a fan of easy autumn baking, our apple dump cake with apple pie filling is another no-fuss weeknight win — but once you’ve made these bars, I promise this is the recipe you’ll reach for every time the apples come into season.
Why this recipe works so well:
- Press-in crust — no rolling pin, no chilling, no special skill needed
- Two-stage baking — pre-baking the base creates a moisture barrier that prevents sogginess
- Firm apple varieties — Granny Smith or Honeycrisp hold their shape and provide a tart contrast to the sweet streusel
- Lemon juice in the filling — keeps the apples bright and cuts through the sweetness
- Cold butter throughout — essential for both the flaky shortbread and those satisfying chunky crumbles on top
Shortbread Crust
- 2 ½ cups all-purpose flour
- 1 cup unsalted butter, cold and cubed
- ½ cup granulated sugar
- ½ tsp salt
Apple Filling
- 6 medium apples, peeled and thinly slicedGranny Smith or Honeycrisp recommended (~900 g / 2 lb total)
- ¼ cup all-purpose flour
- ¼ cup granulated sugar
- 2 tsp ground cinnamon
- ¼ tsp ground nutmeg
- 2 tbsp fresh lemon juice
Streusel Topping
- 1 cup all-purpose flour
- ½ cup packed brown sugar
- ½ cup unsalted butter, cold and cubed
- ½ tsp ground cinnamon
Unchecked Ingredients
Equipment
No food processor? Use a pastry cutter or two butter knives to cut the cold butter into the flour mixture. It takes an extra few minutes but works just as well.
Step-by-Step Method
Preheat and prepare the pan
Preheat your oven to 350 °F (175 °C). Line a 9×13 inch baking pan with parchment paper, leaving at least a 2-inch overhang on both long sides. This creates handles that let you lift the entire slab out cleanly for slicing.
≈5 minMake the shortbread crust
Combine the flour, granulated sugar, and salt in a food processor and pulse twice to mix. Add the cold cubed butter and pulse in short bursts — about 15 to 20 pulses — until the mixture looks like coarse, damp sand with a few pea-sized pieces of butter. Pinch a bit between your fingers: it should hold together.
≈5 minPress and pre-bake the crust
Tip the crust mixture into the prepared pan and press it into an even layer with your fingers or the flat bottom of a measuring cup, working it right into the corners. Bake for 15 minutes until the edges are lightly golden and the centre looks just set.
≈15 min bakePrepare the apple filling
While the crust bakes, peel, core, and thinly slice the apples to about ¼-inch thickness. Place them in a large bowl and toss with the flour, granulated sugar, cinnamon, nutmeg, and lemon juice until every slice is well coated.
≈10 minMake the streusel topping
In a medium bowl whisk together the flour, brown sugar, and cinnamon. Scatter the cold cubed butter over the top and use your fingertips (or a pastry cutter) to work it in until you have irregular crumbles ranging from pea- to hazelnut-sized. Some variation in size is ideal — it gives the topping great texture.
≈5 minAssemble and bake
Spread the apple mixture evenly over the pre-baked crust, making sure to distribute the slices in a roughly even layer. Scatter the streusel over the apples, covering them completely. Bake for 45 to 50 minutes, until the streusel is deep golden brown and a knife inserted into the apple layer meets no resistance.
≈45–50 min bakeCool completely, then slice
Remove the pan from the oven and set it on a wire rack. Let the bars cool in the pan for at least 1 hour — 2 hours for truly clean cuts. Then grip the parchment overhang, lift the whole slab onto a cutting board, and cut into bars with a sharp knife, wiping the blade between cuts.
60–120 min cooling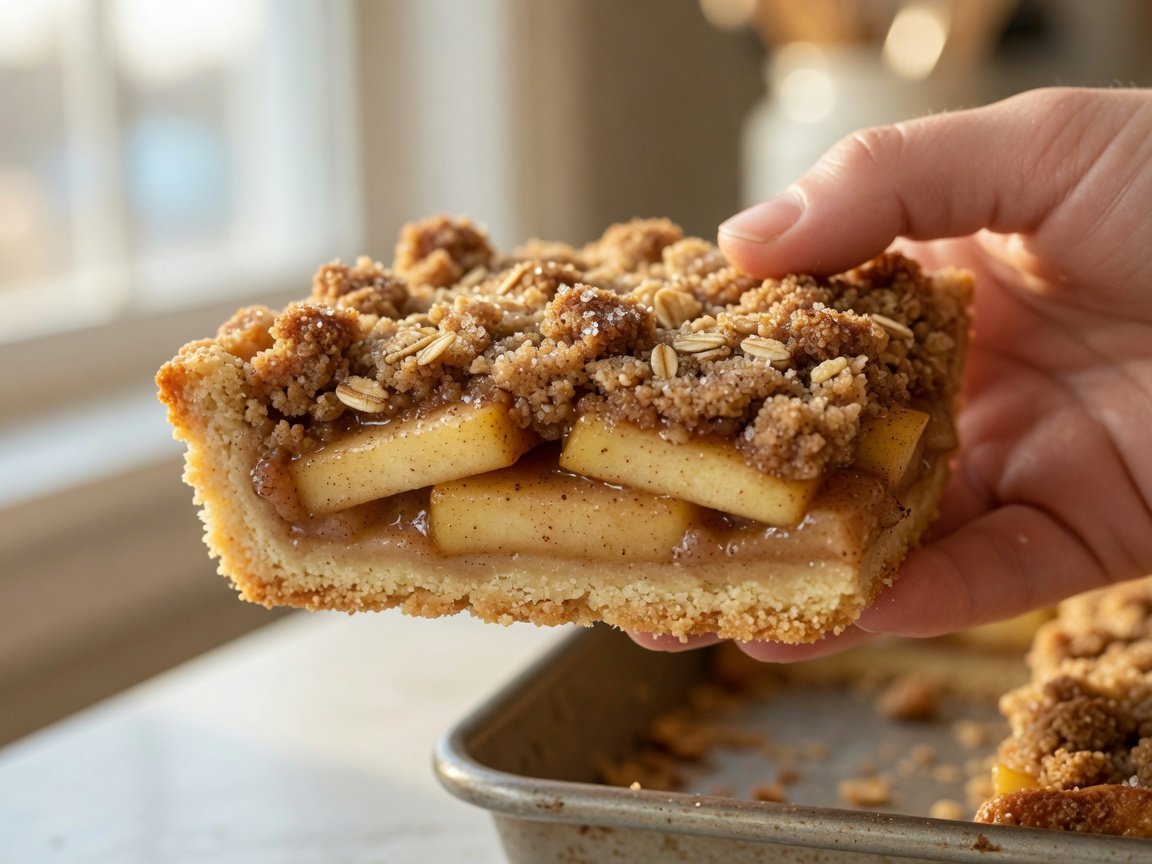
Kitchen Timers
Start each timer as you begin that stage. Browser notification support varies — watch the display if notifications are unavailable.
Pre-Bake Crust
Crust is ready!
Final Bake
Check the streusel!
Cooling Time
Ready to slice!
Nutrition
Nutrition Per Bar
Based on 24 bars. Estimates only — values vary with apple variety and butter brand.| Calories | 210 kcal |
| Total Fat | 10 g |
| Saturated Fat | 6 g |
| Carbohydrates | 29 g |
| Sugars | 14 g |
| Protein | 2 g |
| Dietary Fibre | 1.5 g |
| Sodium | 55 mg |
| Potassium | 75 mg |
These values are calculated estimates. For precise dietary planning, use a nutritional calculator with your exact ingredient brands and weights.
Variations
The recipe as written. Use a mix of Granny Smith and Honeycrisp apples for the best balance of tart and sweet. The shortbread, apple, and streusel layers are all you need — this version is a proven crowd-pleaser.
Add a vanilla glaze for extra sweetness and a pretty finish. Once the bars are completely cool, whisk together 1 cup powdered sugar, 2–3 tablespoons milk, and ½ teaspoon vanilla extract until smooth, then drizzle over the top in zigzags.
For a ready-made version of this glaze idea fully baked in, see our glazed apple pie bars — they use a similar approach with a slightly different base.
Substitute a 1:1 gluten-free flour blend (such as Bob’s Red Mill 1-to-1) for all three flour portions in the recipe — crust, filling, and streusel — in exactly the same quantities. The texture is slightly denser but still delicious.
- Ensure your baking pan is free of cross-contamination if serving to someone with coeliac disease.
- Check that your oats are certified GF if you choose to add them to the streusel.
- The cooling step is even more important with GF bars — they need a full 2 hours to firm up cleanly.
Replace both portions of dairy butter with cold vegan butter (such as Earth Balance sticks or Miyoko’s). All other ingredients in this recipe are naturally vegan.
- Make sure your vegan butter is cold and in stick form, not a soft spread — the texture of the crust and streusel depend on the butter being solid.
- The flavour is slightly different but still very satisfying, and the bars hold together just as well.
Swap the 6 apples for an equal number of firm, ripe Bosc pears (peeled and sliced the same way). Adjust the filling spices: replace the nutmeg with ½ teaspoon ground ginger and add a pinch of cardamom. Everything else stays the same.
Bosc pears hold their shape well under heat, making them the best choice here. Bartlett or Anjou work too but may release more liquid — add an extra teaspoon of flour to the filling if your pears are very ripe.
Drizzle 3 tablespoons of caramel sauce (store-bought or homemade) over the apple filling before you add the streusel. The caramel soaks into the fruit as everything bakes and adds a richness that takes these bars to another level.
- Alternatively, drizzle caramel over the finished, cooled bars for a cleaner look.
- A sprinkle of flaky sea salt over the caramel drizzle is highly recommended.
- Store caramel-glazed bars in the fridge to prevent the caramel from running.
Chef’s Tips
Cold Butter Every Time
Whether you are making the crust or the streusel, the butter must be cold. It coats the flour particles without fully melting into them, which is what creates a crumbly, flaky texture. Work quickly and chill the mixture if it warms up.
Apple Variety Matters
Granny Smith is the classic baking apple for a reason — tart, firm, and holds its shape beautifully. Honeycrisp and Braeburn are excellent choices too. Avoid Red Delicious or McIntosh, which turn to mush in the oven.
Uniform Apple Thickness
Aim for slices about ¼ inch thick. Too thin and the apples go watery and disappear; too thick and the centres stay firm and crunchy after baking. A mandolin slicer makes this effortless if you have one.
The Parchment Sling
This is the difference between bars that lift out clean and bars you end up digging out in pieces. Position the parchment with at least 2 inches of overhang on both long sides before adding any ingredients.
Patience is the Secret
The most common mistake is cutting too soon. Warm bars crumble because the apple filling is still liquid. Give them a full hour at room temperature, or cool for 30 minutes and refrigerate for 30 more for crisp, clean edges.
Make a Day Ahead
These bars are genuinely better on day two, once the layers have settled and the flavours have deepened. Bake the day before, cool completely, refrigerate overnight, and slice just before serving. The clean-up is also much easier.
Common Mistakes to Avoid
Using warm butter
Warm butter melts fully into the flour mixture instead of creating pockets of fat that steam and separate during baking. The result is a dense, greasy crust and flat streusel rather than the crumbly textures you want. Always start with cold butter straight from the fridge.
Skipping the crust pre-bake
Apple juice is released during baking, and without the pre-baked base acting as a barrier, it soaks straight through the crust and turns it soggy. Those 15 minutes are non-negotiable for firm, stackable bars.
Cutting bars while still warm
The apple filling is essentially a loose jam until it cools down and sets. Cutting warm bars gives you apple pudding on a crumbly base — tasty but not presentable. Wait the full hour, or refrigerate to speed things up.
Skipping the parchment overhang
Without handles, you have to dig the bars out of the pan with a spatula, which invariably breaks the first few pieces. The parchment sling takes 30 extra seconds to set up and saves a lot of frustration at serving time.
Storage & Make-Ahead
Room Temperature
2 days
Airtight container; layer bars between sheets of parchment to prevent sticking
Refrigerator
5 days
Airtight container; reheat individual bars 15–20 sec in the microwave for that fresh-baked feel
Freezer
3 months
Wrap each bar individually in cling film, then freeze in an airtight bag; thaw overnight in the fridge
These bars travel brilliantly — stack them in a tin with a sheet of parchment between each layer and they hold up on the way to a party or a bake sale without complaint. If you enjoy taking bar desserts to feed a crowd, our easy cherry pie bars for a crowd use the same handy format and are just as popular at gatherings.