

Aloo Gobi (Potato & Cauliflower Curry)
The ultimate cosy Indian curry — fragrant, hearty, and on the table in 45 minutes
Ah, Aloo Gobi — there’s really nothing quite like it. If you’ve ever walked into an Indian home kitchen and been hit by that gorgeous cloud of turmeric and cumin sizzling in hot oil, you already know exactly what we’re talking about. This combination of potatoes (aloo) and cauliflower (gobi) is pure, unapologetic comfort food. It’s not trying to be fancy, and that’s precisely why it’s so brilliant.
What makes Aloo Gobi so special is how those two humble, everyday vegetables completely transform when coated in a properly built masala. The earthy warmth of turmeric, the fragrant depth of coriander, the gentle heat of Kashmiri chili, and that final flourish of garam masala — it all adds up to something that feels greater than the sum of its parts. And the best part? It’s genuinely easy to make, once you know the key steps.
This is the kind of dish that works equally well as a hearty weeknight main or a side dish at a dinner spread. Serve it alongside hot rotis and a dollop of yogurt, or pile it on top of steamed basmati rice. Either way, people will ask for seconds. If you love vegetarian Indian cooking, you might also want to try our Chana Masala — it’s another brilliant one-pot classic that uses a similar spice base.
Ingredients
- Vegetables
- potatoes, peeled and cut into 1-inch cubes
- cauliflower, cut into medium florets
- onion, finely chopped
- tomatoes, roughly chopped (or 200g canned chopped)
- Aromatics & Paste
- ginger-garlic paste (or 1 tbsp each minced fresh)
- Spices
- cumin seeds
- turmeric powder
- Kashmiri red chili powder (or ½ tsp paprika + ½ tsp cayenne)
- coriander powder
- garam masala (added at the very end)
- For Cooking & Serving
- neutral cooking oil (sunflower, rapeseed, or avocado)
- to taste salt
- kasuri methi (dried fenugreek leaves) — optional but excellent
- for garnish fresh coriander (cilantro) leaves
Your Shopping List
Equipment You’ll Need
How to Make Aloo Gobi
-
Prep & Soak — 10 min
Peel the potatoes and cut them into roughly 1-inch cubes — uniform size means even cooking. Cut the cauliflower into medium florets (keep them a touch bigger than your potato cubes, since they cook faster). Pop the potato cubes into a bowl of cold water and let them soak for 10 minutes. This draws out the excess starch and gives you a much nicer texture in the finished curry.
Pat the cauliflower florets dry after washing — any excess water in the pan will make them steam rather than sauté, and you’ll end up with soggy florets instead of nicely coated ones. -
Parboil the Potatoes — 8 min
Drain the soaked potatoes and add them to a pot of lightly salted boiling water. Boil for 6–8 minutes until they’re about halfway cooked — a sharp knife should meet a little resistance in the centre. Drain immediately and set aside. Don’t fully cook them here; they’ll finish in the curry and absorb all that beautiful spiced sauce.
If you skip this step and add raw potatoes directly to the pan, you risk the cauliflower turning to mush long before the potatoes are done. Parboiling is the move, every time. -
Temper the Cumin — 1 min
Heat the cooking oil in your large pan or kadai over medium heat. When it’s hot (a cumin seed should sizzle immediately when dropped in), add all the cumin seeds at once. Stand back — they’ll splutter! Let them crackle and turn a shade darker for about 30 seconds. This “blooming” releases their essential oils and builds the fragrant foundation of the curry.
The oil needs to be properly hot before the cumin goes in, or the seeds will just absorb oil and go soggy. Test the heat first — a single seed should sizzle and dance within 2 seconds. -
Sauté the Onions Golden — 8–10 min
Add the finely chopped onions and stir to coat in the cumin-scented oil. Now cook over medium heat, stirring regularly, for a full 8–10 minutes until they turn a deep, rich golden brown. Don’t rush this — the caramelisation of the onions is what gives the masala base its sweetness, body, and colour. Pale onions mean a pale, one-dimensional curry.
If the onions start to catch on the bottom, add a splash of water (about 2 tbsp) and scrape up the stuck bits — that’s flavour. Keep going until they’re properly golden. -
Add Ginger-Garlic Paste — 2 min
Stir in the ginger-garlic paste. It’ll sizzle and spatter (have your spoon ready!) — cook for 1–2 minutes, stirring constantly, until the harsh raw smell completely disappears. The mixture should smell fragrant and almost nutty. If it’s sticking, add the tiniest splash of water.
Raw garlic in the finished curry is not pleasant, so don’t shortcut this stage. You’ll know it’s ready when the sharp smell gives way to something warm and aromatic. -
Build the Masala Base — 7–8 min
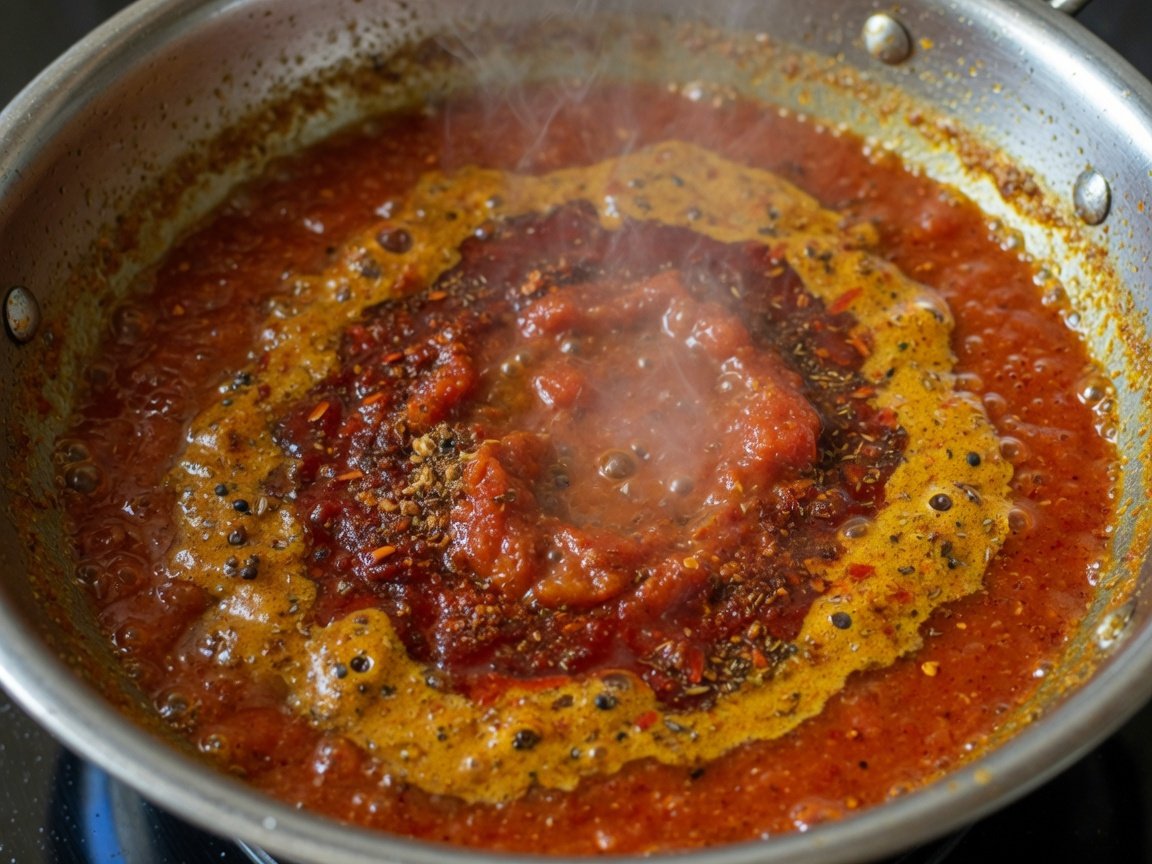
Add the chopped tomatoes, turmeric, red chili powder, and coriander powder all at once. Stir well to combine. Cook over medium heat for 7–8 minutes, stirring occasionally, until the tomatoes completely break down and the oil starts to separate from the masala around the edges of the pan. This “oil separation” moment is your green light — the masala is done and ready for the vegetables.
The oil separation is a genuinely important visual cue in Indian cooking — it tells you the spices have cooked out, the tomatoes have fully broken down, and the masala has concentrated properly. Don’t move on before you see it. -
Add Vegetables & Coat with Spices — 2 min
Add the parboiled potatoes and the raw cauliflower florets to the masala. Stir gently but thoroughly to coat every piece in the rich spice base. Season generously with salt. Cauliflower is wonderfully versatile here — it soaks up spice flavours brilliantly, whether you’re making this curry or something completely different like crispy Air Fryer Buffalo Cauliflower on a lighter day.
Stir gently at this stage — a heavy hand will break up the parboiled potatoes. You want them intact so they can absorb the masala without falling apart. -
Cover and Simmer — 15–20 min
Add 2–3 tablespoons of water if the pan looks dry, then cover with a lid. Reduce heat to low and cook for 15–20 minutes, lifting the lid to stir gently every 5 minutes. The curry is done when both the potatoes and cauliflower are tender all the way through — a fork should slide in without resistance — but not so soft they’re falling apart.
Resist the temptation to add lots of water. Aloo Gobi should have a relatively dry, clingy consistency rather than a soupy gravy. Add water only to prevent sticking. -
Finish with Garam Masala — 5 min rest
Sprinkle the garam masala evenly over the curry. If you have kasuri methi, crush the dried leaves between your palms (this releases the flavour) and scatter them over too. Stir gently, then turn off the heat, cover the pan, and let everything rest for 5 minutes. This resting time lets the warm spices bloom into the dish without any risk of bitterness from overcooking.
Never add garam masala early in the cooking process. It contains delicate aromatic spices (cardamom, cloves, cinnamon) that become bitter with prolonged heat. It belongs right at the end. -
Garnish & Serve
Transfer your gorgeous Aloo Gobi to a serving dish and scatter generously with fresh coriander leaves. Serve immediately while it’s hot, alongside warm rotis, flaky parathas, or a bowl of steamed basmati rice. A spoonful of cool yogurt on the side is optional but deeply satisfying. Enjoy every bite — you’ve earned it!
Cooking Timers
Tap a timer when you start each stage. The first start will ask for notification permission.
Parboil Potatoes
Sauté Onions
Cook Masala
Simmer Curry
Rest Off Heat
Browser notifications will alert you when a timer finishes.
Nutrition Facts
Per serving (recipe makes 4 servings). Values are estimates and may vary based on exact ingredients used.
| Nutrient | Per Serving | % Daily Value* |
|---|---|---|
| Calories | 208 kcal | |
| Total Fat | 9g | 12% |
| Carbohydrates | 28g | 10% |
| Dietary Fibre | 5g | 18% |
| Total Sugars | 5g | — |
| Protein | 5g | 10% |
| Sodium | 320mg | 14% |
| Potassium | ~700mg | 15% |
| Vitamin C | ~45mg | 50% |
| Iron | ~2mg | 11% |
*Based on a 2,000-calorie daily diet.
Recipe Variations
Aloo Gobi is wonderfully adaptable. Here are our favourite ways to remix it.
Classic Home-Style Aloo Gobi
The recipe on this page — straightforward, honest, and exactly how millions of Indian families make it every day. Naturally vegan, gluten-free, and dairy-free. The tomato-based masala gives it a slightly moist consistency that’s perfect for scooping up with roti. No modifications needed, just good ingredients and a bit of patience at the onion stage.
- Follow the recipe as written — no changes needed
- For extra body, mash one or two potato pieces into the sauce during the simmer
- A pinch of sugar can balance overly acidic tomatoes
Restaurant-Style (Rich & Silky)
Want that luxurious, dhaba-style depth? Here’s how the professionals do it. The cashew paste or cream turns this into something quite special — still vegetarian, but much richer. Great for dinner parties when you want to impress.
- After the masala is cooked, stir in 2 tbsp cashew paste or heavy cream before adding vegetables
- Add a pinch of sugar to balance the richness
- Finish with a pat of butter or ghee along with the garam masala
- A light sprinkle of dried red chili flakes on top looks stunning
Aloo Gobi Sabzi (Dry-Style)
The “sabzi” (dry vegetable) version is beloved across North India — it has a more intense, concentrated flavour because there’s no liquid added. It’s particularly good stuffed inside a paratha or served as part of a larger thali spread. Think of it as the crispy, fragrant sibling of the classic curry.
- Skip the tomatoes (or use only 1 small tomato for flavour without too much liquid)
- Add all the spices directly to the oil after the ginger-garlic paste — no tomato base
- Cook on medium-high heat, stirring frequently — you want some browning on the vegetables
- Skip the water entirely; the vegetables will cook in their own steam under the lid
- Serve with hot parathas or puri
Low-Carb Version
Want all the warming spice flavour with less starch? Dial back the potato and double the cauliflower. You still get that satisfying, hearty feeling without the carb load. The spice base works just as beautifully — and if you love low-carb Indian-inspired cooking, you’ll also enjoy our Keto Coconut Curry for a completely different but equally fragrant direction.
- Use 1 small potato (instead of 3 medium) and 1.5 heads of cauliflower
- Add a large handful of baby spinach in the last 2 minutes for extra nutrients
- Swap cooking oil for coconut oil to add healthy fats and a gentle sweetness
- Serve with cauliflower rice instead of regular basmati to keep it fully low-carb
Aloo Gobi Matar (With Peas)
Adding green peas (matar) is one of the most popular variations, and honestly it just works. The sweetness of the peas plays beautifully against the earthy spices, and the pop of green makes the dish look even more vibrant. This is the version that often appears at wedding buffets and celebrations across India.
- Add ½ cup of frozen green peas along with the cauliflower in step 7
- Frozen peas are perfect — no need to thaw, they’ll warm through quickly
- Fresh peas work if in season; reduce simmering time slightly as they cook faster
- A tiny squeeze of lemon juice over the finished dish makes all the flavours pop
Chef’s Tips for Perfect Aloo Gobi
These are the small things that make a big difference.
Soak Your Potatoes
That 10-minute cold water soak reduces excess starch, which means less gumminess in the final dish and faster cooking. Don’t skip it.
Go Dark on the Onions
Pale golden is not enough. You want a deep, rich amber — almost mahogany. That level of caramelisation is what gives the curry its backbone. It takes 8–10 minutes of patience, but it’s worth every second.
Wait for Oil Separation
When you see rivulets of orange oil collecting at the edges of the masala, the raw spice flavour has cooked out completely. This is the moment your masala goes from “spiced tomatoes” to a proper curry base.
Size Matters for Even Cooking
Keep potato cubes uniform (1 inch) and cauliflower florets slightly larger. Since the potatoes are parboiled and cauliflower cooks faster, they should finish at the same moment if sized correctly.
Kasuri Methi Is the Secret
If you want to know why restaurant Aloo Gobi tastes different from home cooking, this is often the answer. Dried fenugreek leaves add a subtle, complex bitterness that rounds out the whole dish. Find them at any South Asian grocery store.
Rest Before Serving
That 5-minute rest off the heat isn’t just a suggestion — it’s when the garam masala and kasuri methi really infuse into the dish. It also gives you a moment to make the chai.
Common Mistakes to Avoid
Not Cooking the Onions Long Enough
This is the number-one reason home-cooked Indian curries taste different from restaurant ones. Pale, barely-softened onions give you a weak, thin-tasting masala. Be patient — keep going until they’re genuinely golden-brown.
Adding Cauliflower Too Early or Too Late
If you add raw cauliflower right at the start (before the masala is built), it absorbs too much oil and disintegrates. If you add it right at the end with barely any cooking time, it stays raw in the middle. The sweet spot is adding it to the finished masala and simmering covered for 15–20 minutes.
Adding Garam Masala Too Early
Garam masala is a finishing spice, not a cooking spice. Add it early and you’ll get a bitter, muddled flavour instead of the warm, fragrant lift it’s supposed to deliver. Always add it in the final minute or off the heat entirely.
Using Too Much Water
Aloo Gobi is not a soup. It should be semi-dry with a clinging sauce — the masala coats the vegetables rather than drowning them. Add water only in small amounts (2–3 tablespoons at a time) to prevent sticking, never to create gravy.
Skipping the Parboiling Step
Raw potatoes and cauliflower florets have very different cooking times. Without parboiling the potatoes first, you face a tough choice: undercooked potato or overcooked, mushy cauliflower. The extra 8 minutes of parboiling solves this completely.
Storage & Make-Ahead
Good news: Aloo Gobi actually tastes better the next day as the flavours continue to develop overnight. It’s a brilliant meal-prep dish.
Refrigerator
Store in an airtight container for up to 4 days. Allow to cool fully before refrigerating.
Freezer
Freeze for up to 3 months. Note that cauliflower texture softens after freezing — still tasty, just less firm.
Reheating
Reheat gently on the stovetop with a splash of water, stirring occasionally. Microwave on medium power works well too.
Meal Prep
Make a double batch on Sunday for easy weeknight dinners. The masala base can be made 3 days ahead and stored separately.
What to Serve With Aloo Gobi
For a complete Indian meal, try these pairings:
- 🫓 Hot rotis or parathas
- 🍚 Steamed basmati rice
- 🫙 Plain yogurt or raita
- 🥗 Sliced onion salad with lemon
- 🌶️ Mango or lime pickle
- 🍞 Warm naan bread
For a fuller spread, pair Aloo Gobi with our comforting Egg Curry — together they make an excellent, colourful vegetarian thali. Non-vegetarian diners at the table? Our Easy Chicken Curry makes a perfect companion dish that uses a similar spice base.
Frequently Asked Questions
Absolutely — and it actually gets better. The spices continue to infuse overnight, so day-two Aloo Gobi often tastes richer and more developed than freshly made. Cook it fully, cool to room temperature, then refrigerate in an airtight container for up to 4 days. Reheat on the stovetop with a small splash of water to loosen it up.
Three likely culprits. First, the florets might be too small — tiny pieces overcook very quickly. Keep them at medium size (roughly golf-ball-sized pieces broken into florets). Second, you might be adding too much water during the simmer — use just a tablespoon or two to prevent sticking, not to create liquid. Third, the heat might be too high — a low, covered simmer is much gentler on cauliflower than a rolling boil.
Yes, with a small caveat. Cauliflower becomes noticeably softer after freezing and thawing — the texture changes, though the flavour stays lovely. If that doesn’t bother you, freeze it for up to 3 months in portioned freezer bags or airtight containers. Potatoes hold up better. Thaw overnight in the fridge and reheat gently on the stovetop.
Yes! Frozen cauliflower works well in this recipe. Add it directly from frozen in step 7 — no need to thaw. Reduce the added water to zero (frozen cauliflower releases moisture as it cooks), and check doneness a few minutes earlier than the recipe states, as frozen florets tend to cook faster than fresh.
The chili powder is your primary heat dial. For a milder dish, replace all the Kashmiri chili with sweet paprika — you keep the beautiful red colour without the heat. For medium, use the recipe as-is. For a spicier version, add ¼–½ tsp of cayenne pepper alongside the Kashmiri chili. You can also add 1–2 finely chopped fresh green chilies along with the ginger-garlic paste for a fresh, piercing heat.
Great question. The “wet” or curried version (this recipe) has a tomato-based masala that clings to the vegetables and creates a saucy consistency — ideal for eating with rice or bread to mop up the sauce. The “dry” version, called Aloo Gobi sabzi, uses little or no tomato, less oil, and higher heat to create a more stir-fried, browned result where every piece is distinct and slightly caramelised. Both are delicious — the dry version is particularly brilliant stuffed inside a paratha.
Your Notes & Rating
How did it go?
Notes save automatically to your browser.